

Boston ferns are low-maintenance plants that grow well under partial shade and need little fertilizer to thrive. But just like any other houseplant, they require periodic replanting to maintain their lush and impressive appearance.
If you’re unsure how to repot a Boston fern, look no further than the steps below.
Table of Contents
Step-by-Step Guide to Repot a Boston Fern
What to prepare
Before transplanting ferns to pots, prepare the following items to make your work easier.
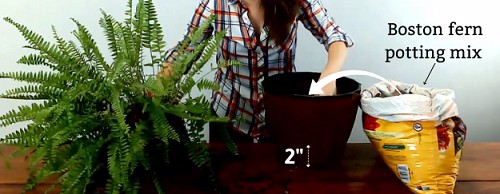
- Boston fern soil mix
Boston ferns prefer a soilless, peat-based potting mix with adequate drainage. Commercial fern potting blends are probably your best bet, as they should have materials to facilitate moisture absorption and aeration, like perlite and sphagnum peat moss.
- Container
The container should be two inches wider than your current one. The depth doesn’t matter as much, so long as it equals the plant’s height or measures only a few inches taller. This Boston fern pot size will leave enough space for water to soak in without making the soil soggy.
Also, opt for plastic for your container unless you’re putting your plant outside in a hot environment, in which case ceramic or clay will be better for keeping the plant cool. Last but not least, look for drain holes to minimize rot.
- Trowel
- Watering can
- Shears, knife, and 70% rubbing alcohol to sanitize the cutting tools
- Tray to catch excess water
Steps for transplanting Boston fern
Step 1. Water the plant.
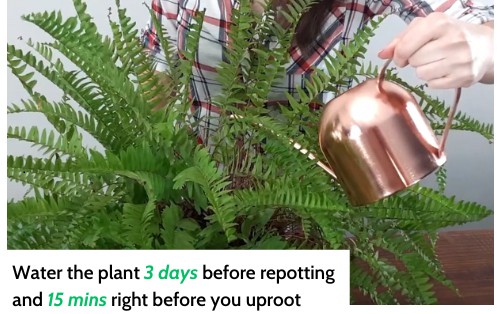
The best way to minimize transplant shock and ease the plant’s removal from the pot is to water it before transplanting.
Do this step three days before repotting and 15 minutes right before you uproot the Boston fern. Use a tray or any tablecloth you have at hand to catch the excess water.
Step 2. Take the Boston fern out of its container.
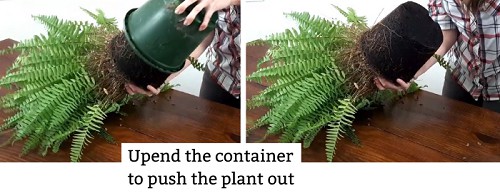
Upend the container to push the plant out. You may run a trowel along the rim if the fern doesn’t slide out immediately, but refrain from grabbing and shaking the foliage in the process.
Instead, hold the fern at the base and lift it out. Alternatively, stick a small and hard object in the drainage hole to force the plant out. If all else fails, cut the pot.
Step 3. Loosen the roots and (optional) divide your large Boston fern.
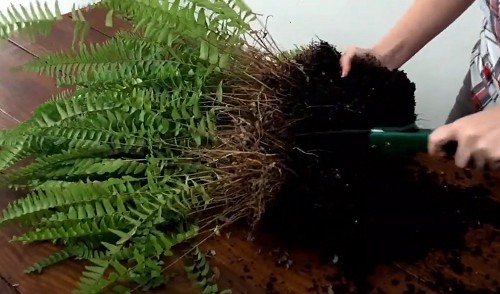
Check your plant for any dense, circular roots and pry them apart or trim off sections that form large tangles.
If you have a big Boston fern, consider dividing it before repotting it into new containers. This method is preferable if none of your pots are expansive enough for the plant as it is. To start, simply take a knife and cut the roots into halves or quarters.
Remember to keep the foliage intact when you divide a Boston fern, and clip each root to no smaller than one or two inches in size.
Instead of using divisions, you can also use runners for Boston fern propagation. These runners or offsets look like small ferns at the base of the plant. You only need to cut them off and resow them, similar to how we divide and repot Boston fern.
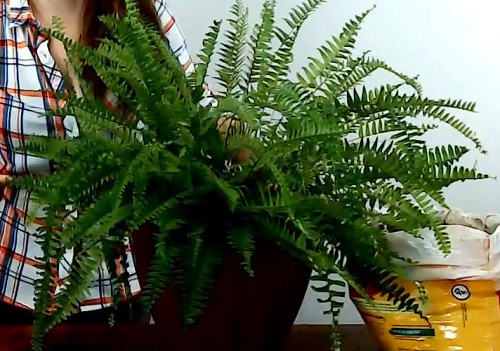
Step 4. Put the fern in container.
Put two inches of your Boston fern potting mix into the new container. Place the plant into the soil mix, then backfill the pot so that the roots are covered.
Press the soil with your fingers to eliminate air pockets, and ensure there’s at least one inch empty at the top of the container to allow for irrigation.
Water the pot thoroughly so that the planting medium is damp and water drips from the drain holes.
Best Time to Repot a Boston Fern
Spring and summer are the best replanting periods, unless you need to repot a dying Boston fern to save it. In such a case, any season is fine.
Another time changing containers is necessary is when you have an infertile soil mix that no longer serves the plant. In this scenario, a new potting medium will provide nutrients that boost the health of the Boston fern and help it grow.
I also advise replanting Boston ferns if their roots are sticking out of the container, either through the drain holes at the bottom or the upper edges of the pot. This also answers the question of whether ferns like to be root bound.
While these plants will do well in small spaces, too much constriction will lead to wilting and stagnant growth. It’s best to move them before they crack the container or visible problems occur.
Caring After Repotting
Check the soil every other day and water it whenever it gets dry. As a rule of thumb, it’s better to give little moisture over several waterings rather than a lot at once.
This type of plant also prefers humidity, so mist it after you plant a fern in a pot and whenever the leaves turn brown.
As for where to put Boston ferns, someplace with bright, indirect sunlight is best, such as a window facing the east if grown indoors or a spot under the partial shade outside. If the sunshine is very harsh where you live, consider installing curtains to limit exposure.
All things considered, a humid bathroom may be the perfect place for repotting ferns in hanging baskets, so long as the temperature there averages 65 to 75℉ and never goes above 95 or under 35 degrees.
Aside from basic care conditions, some Boston fern problems owners need to be mindful of are whiteflies, mealy bugs, and fungus gnats, all of which can damage our plant and ruin its appearance. Fortunately, all of these insects will fall off with a blast from a garden hose and are controllable with an application of insecticidal sprays.
Another thing to keep in mind while growing Boston ferns is fertilization. Do not feed the plant for four to six months after moving it. Wait until the fern has adjusted to its new environment to give it a monthly 20-10-20 fertilizer during spring and summer.
FAQs
What kind of potting soil do Boston ferns need?
Boston ferns prefer soil with a pH of 6 to 6.5. Regular indoor plant mixes will work, as will the following combinations:
- Equal parts of a standard plant mix and peat moss
- Perlite, vermiculite, and peat moss in a 1:1:2 ratio
- Perlite, peat, and potting soil in a 1:1:2 ratio
The importance of repotting a Boston fern
Repotting Boston ferns not only provides space for them to grow. It’s also an effective remedy for sick plants with root rot that deprives the fern of oxygen and has the potential to kill it.
Since rot stems from the presence of fungi in the soil, changing the container, trimming off dead roots, and putting the plant in a fresh potting mix will isolate the problem.
How often to repot a Boston fern?
Every two to three years is a helpful standard to adhere to. Examine the plant regularly to see if you need to repot a root bound fern or one that’s sick and dying due to overwatering and excessive fertilizing, which are common problems.
Conclusion
Hanging Boston fern is a natural air purifier that doesn’t cost much money to purchase. Its ability to remove formaldehyde is impressive, even when compared to other plants, and for individuals who smoke or live near a lot of traffic, these ferns are worth the investment, if only for the respiratory benefits they bring.
One only needs to learn how to repot a Boston fern and care for it, which is simpler to do than you might think.
Related:
- Repotting Succulents in 4 Easy Steps
- Detailed Guide on Repotting a Venus Flytrap
- Step by Step to Repot a Monstera Plant

Hi, I am William – Floridayards’ digital content creator. My job is to find answers to all your concerns with thorough research and our team’s expert advice. I will also bring you honest reviews on the best products and equipment for raising your beautiful garden. Please look forward to our work!